JIRA DC Architecture with Docker
In this article, I will talk about how we can set up the Atlassian JIRA Data Center architecture on Docker. First, let’s examine the structure that Atlassian recommends as a best practice for JIRA.

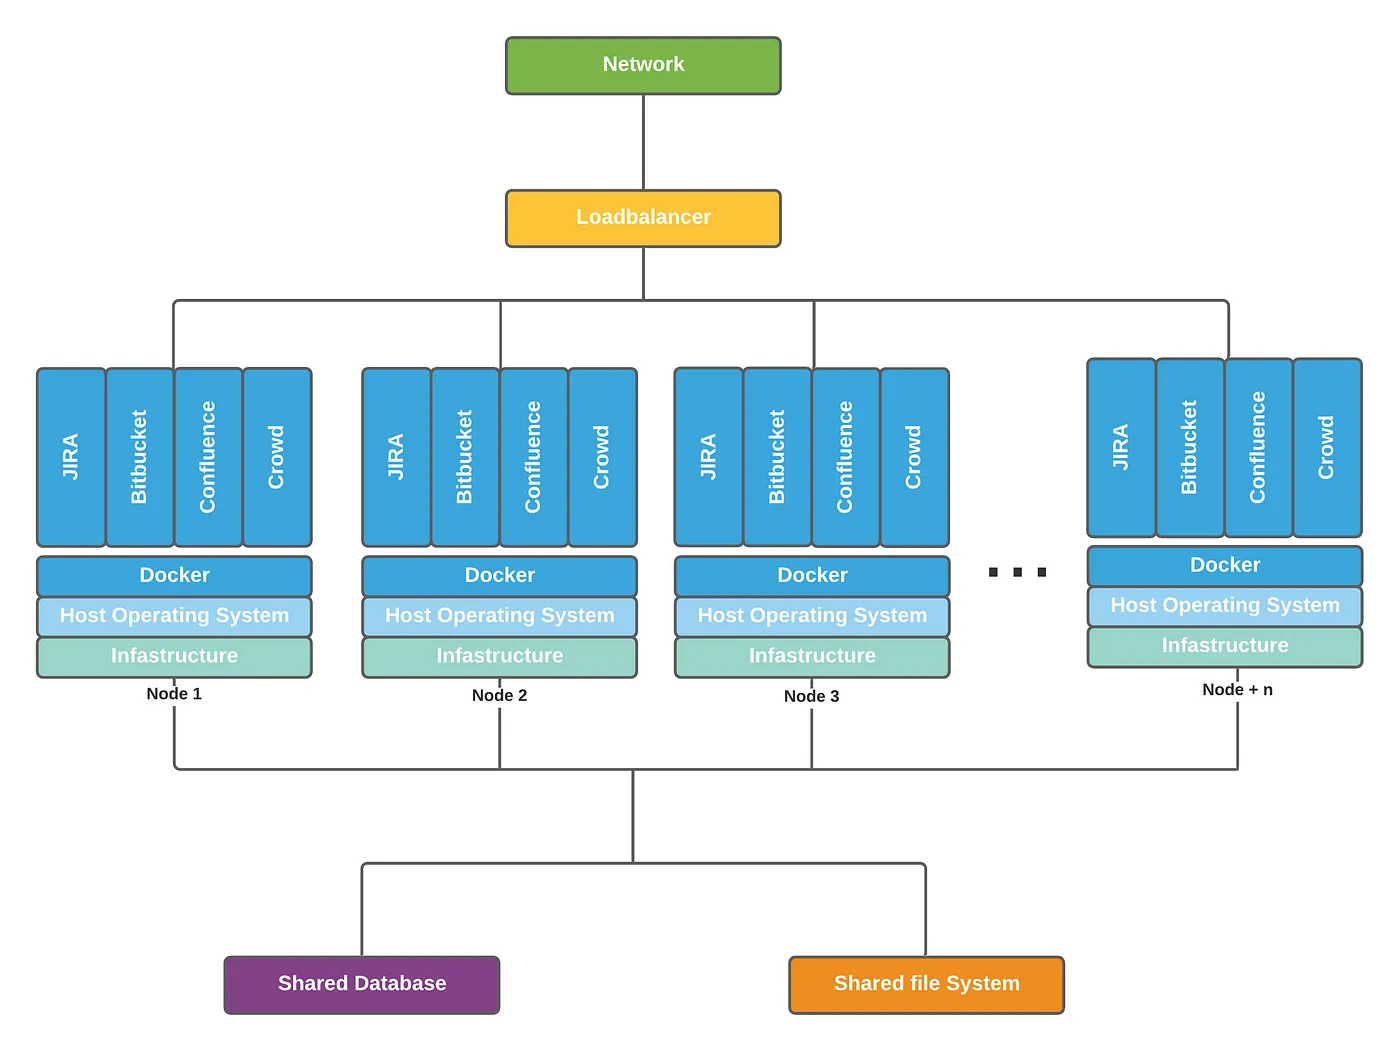
When we look at this structure, we see that it includes JIRA nodes, a shared database to which these nodes are connected, and a shared file system (e.g., NFS). By positioning these components behind a load balancer (e.g., HAProxy), we make our data center setup accessible over the network. At this point, our system is fully ready.
Now, we will modify the original setup slightly. The first change will be in our JIRA Cluster Nodes. We will install Docker and Docker Compose on these machines and run our JIRA instances as containers using Docker Compose configuration files (docker-compose.yml) created on these machines. In our configuration files, we will use the official image shared by Atlassian on DockerHub for JIRA.
version: '2'
services:
  jira-node1:
    image: atlassian/jira-software:8.13.7
    container_name: jira-software-node1
    network_mode: host
    volumes:
    - /mnt/prod-jira-data/:/var/atlassian/application-data/jira/shared
    environment:
      CLUSTERED: "true"
      JIRA_SHARED_HOME: /var/atlassian/application-data/jira/shared
      JIRA_NODE_ID: node1
      EHCACHE_LISTENER_HOSTNAME: node1
      EHCACHE_LISTENER_PORT: 40002
      EHCACHE_OBJECT_PORT: 40012
      EHCACHE_PEER_DISCOVERY: default
Reviewing the docker-compose.yml file for JIRA on Node 1
If we look at the definitions for the jira-node1 service in our docker-compose.yml file on Node 1
- image: We define the official Docker image provided by Atlassian.
- container_name: We define the name of the JIRA container that we will launch with Docker Compose.
- network_mode: This specifies the network mode of the container. In this example, we choose the host mode because we want to make the container behave as if it is the host machine itself.
- volumes: We define the folder inside the JIRA container that will be bound to a directory on the physical machine.
- environment: We configure JIRA-specific settings using environment variables.
A quick overview of the environment variables
- CLUSTERED: Determines whether JIRA will run in cluster mode. For the Data Center setup, we set this to true.
- JIRA_SHARED_HOME: Specifies the directory where JIRA will store files shared with other nodes. This is crucial because this directory connects to the Shared-File System.
- JIRA_NODE_ID: Defines the specific ID for the JIRA node. If left empty, the JIRA container will generate a different unique ID each time it is created.
- EHCACHE_LISTENER_HOSTNAME: Defines the hostname of the machine running the JIRA container for cache communication. If not specified, JIRA will automatically resolve it.
- EHCACHE_LISTENER_PORT: Specifies the port the node will listen to for cache communication. We use the default value, 40001.
- EHCACHE_OBJECT_PORT: Defines the port used for remote object bindings in the registry for searches/operations.
- EHCACHE_PEER_DISCOVERY: Determines how nodes discover each other on the network. We can leave this at its default value for this example.
After completing these configurations, we use the docker-compose command to launch our JIRA container on Node 1.
docker-compose -f jira-compose-node1.yml up -d
Completing the JIRA Setup and Expanding the Cluster
After launching the JIRA container with Docker Compose, we can complete the standard JIRA setup. Once the setup on Node 1 is completed, we will start JIRA instances on other nodes similarly and ensure they join the cluster. Since the steps are the same for each joining instance, I will only describe the process for Node 2.
First, we will create a docker-compose.yml file on Node 2 and modify some of the configurations from Node 1 while adding new definitions.
version: '2'
services:
  jira-node2:
    image: atlassian/jira-software:8.13.7
    container_name: jira-software-node2
    network_mode: host
    volumes:
    - /mnt/prod-jira-data/:/var/atlassian/application-data/jira/shared
    environment:
      CLUSTERED: "true"
      JIRA_SHARED_HOME: /var/atlassian/application-data/jira/shared
      JIRA_NODE_ID: node2
      EHCACHE_LISTENER_HOSTNAME: node2
      EHCACHE_LISTENER_PORT: 40002
      EHCACHE_OBJECT_PORT: 40012
      EHCACHE_PEER_DISCOVERY: default
      ATL_JDBC_URL: jdbc:postgresql://db-ip-address:5432/jiradb
      ATL_JDBC_USER: jiradb_user
      ATL_JDBC_PASSWORD: myjiradbpassword
      ATL_DB_DRIVER: org.postgresql.Driver
      ATL_DB_TYPE: postgres72
      ATL_DB_SCHEMA_NAME: public
We adjust the EHCACHE_LISTENER_PORT and EHCACHE_OBJECT_PORT values, as these should be different for each node. You can find more detailed information on this topic here. Additionally, let’s examine the environment variables that must be present on every joining node but were not included in Node 1.
- ATL_JDBC_URL: The database address used by the nodes in the cluster.
- ATL_JDBC_USER: The username for database access.
- ATL_JDBC_PASSWORD: The password for the database user.
- ATL_DB_DRIVER: The database driver used for the connection. In this example, we use the PostgreSQL driver.
- ATL_DB_TYPE: Since we use PostgreSQL, we set this to postgres72.
- ATL_DB_SCHEMA_NAME: Since we perform the installation on the public schema, we define it as public.
After defining these configurations, we use the following command to launch a new JIRA container on Node 2. The newly launched JIRA instance will automatically join the JIRA Data Center setup.
Note: When joining Node 2, the JIRA container on Node 1 should be stopped. Once the JIRA container on Node 2 is fully set up, you can restart the JIRA container on Node 1.
By following the steps taken for Node 2, you can launch multiple JIRA instances and have them join the cluster. Additionally, a similar setup can be applied to other Atlassian Data Center products.
Conclusion
In summary, I have explained how you can set up JIRA, one of Atlassian’s most important products, in a Data Center architecture using Docker containers. I hope this has been helpful. Here is the GitHub repository link for reference. See you in my next article!